
Contents
In an era where digital ads are increasing and users are easily distracted, it has become essential to rely on effective tools to block ads without resorting to additional software that may burden device resources. Microsoft Edge browser offers a built-in ad blocker feature based on the same Chromium engine used by Chrome.
In this article, we present the steps to activate this feature and customize its settings for a faster and safer browsing experience, relying on the latest recommendations from trusted sources such as Microsoft’s official documentation and specialized tech articles.
The Importance of the Built-in Ad Blocker Feature in Edge
The importance of using the built-in ad blocking feature in Edge lies in its high efficiency without the need to install external extensions that may interfere with browser performance or consume excessive memory. The feature relies on the tracking prevention technology developed by Microsoft, providing three main levels of blocking:
Basic (Basic), Balanced (Balanced), Strict (Strict). Each level differs in its ability to prevent tracking files and ads, allowing users the freedom to choose the appropriate degree based on their priorities between privacy and page load speed.
How to Enable the Built-in Ad Blocker Step by Step
Accessing the Browser Settings
Follow these steps: (You can try the following path and move to the next paragraph edge://settings/privacy/trackingPrevention)
- 1. Open Microsoft Edge browser and click on the three-dot icon in the upper right corner.
- 2. Select “Settings” (Settings) from the dropdown menu.
- 3. In the sidebar settings panel, select the section “Privacy, search, and services” (Privacy, search, and services).
Enabling Tracking Prevention
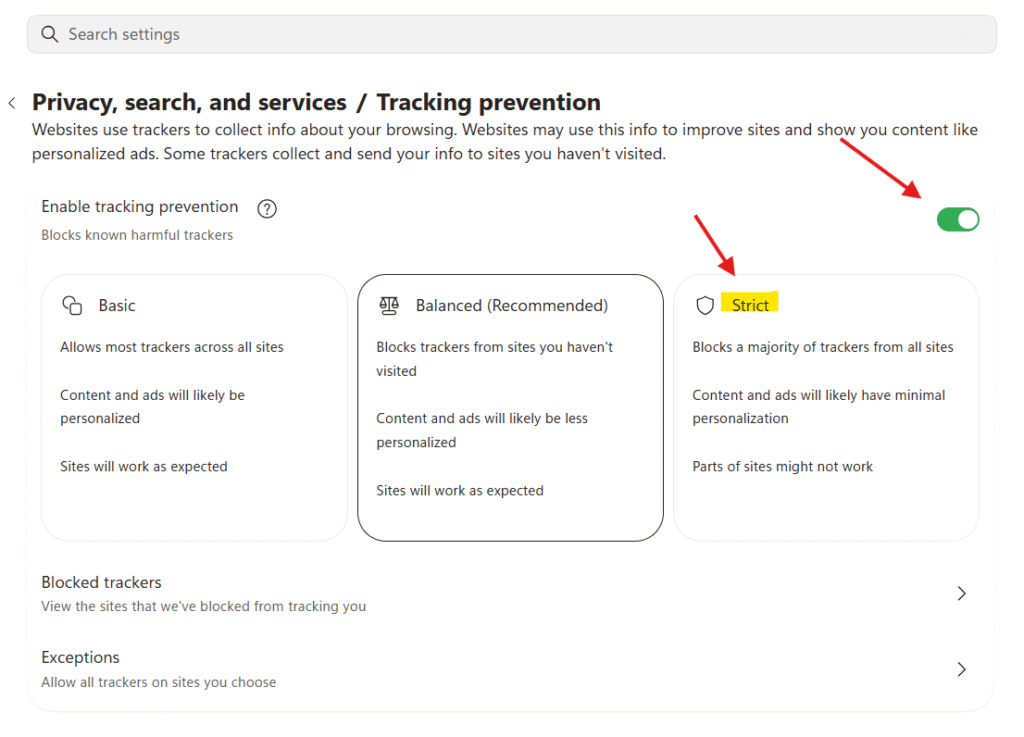
When you enter the “Privacy and services” page, you will find a section for “Tracking prevention“. Toggle the switch to the On position if it is not already enabled. After activation, a bar will appear to choose the level of blocking.
Adjusting the Blocking Level
You can choose one of the following three levels:
– Basic: Blocks some harmful tracking files and provides a smooth browsing experience without undermining non-intrusive ads.
– Balanced: The default option, balancing performance and tracking protection.
– Strict: Stops most tracking files and ads, but may cause interruptions in some page elements or web applications.
How to Customize the Blocking Level by Sites
Sometimes you may need to exclude certain sites from blocking to ensure they function properly, such as news sites or online banking. To customize the settings:
1. In the “Tracking prevention” section, click on “Exceptions” (exceptions).
2. Click on “Add Site” (Add Site) and enter the address of the site you want to allow ads on.
3. Save changes and the custom setting will apply when visiting the site.
In this way, you can maintain a clean browsing experience for most sites while allowing some necessary ads or for your favorite sites.
Prevent Previously Visited Websites from Tracking You on Edge
The previously visited websites have surely planted tracking codes to monitor interests, before adjusting your strict settings, to cancel their tracking files. Enter Blocked Trackers from the same previous page or follow the path edge://settings/privacy/trackingPrevention/blockedTrackers.
Now you will find an extensive list of all the websites that track your interests. This is what I found in my browser :
“Tracking prevention blocked 2003 trackers”
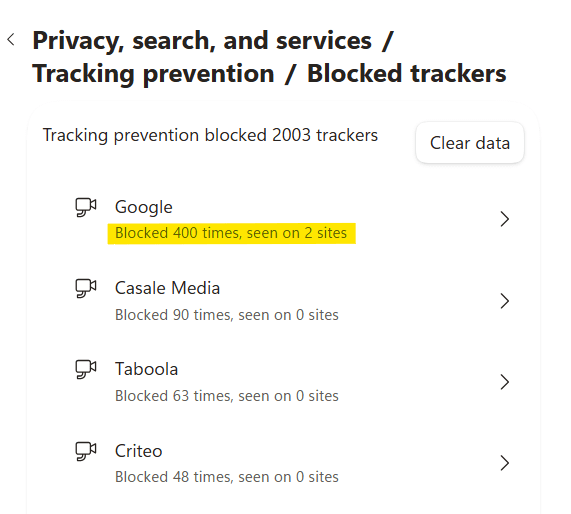
Yes, 2003 sites are tracking me. All you have to do now is click the Clear Data button to clear the tracking files for these sites.
It also shows you under each site the number of times Microsoft Edge has blocked it. By clicking on each site individually, you can see where it was blocked if it was previously blocked.
Additional Tips for a Popup-Ads-Free Browsing Experience
To enhance the effectiveness of the built-in blocking feature in Edge, we recommend the following steps:
1. Regularly update the browser: Ensure that you are using the latest version of Edge to benefit from the latest security enhancements and tracking prevention technologies.
2. Clear cookies and cached files from time to time: This helps remove old data that may allow targeted ads.
3. Disable annoying notifications: In “Site settings”, turn off the “Notifications” feature for untrusted sites.
4. Monitor performance: Go to “Performance and loading” to see how extensions or sites are using resources and manually stop heavy elements.
Frequently Asked Questions
Do you need to install external extensions with Edge to block ads?
No, the built-in feature is sufficient for many daily uses. Unless you are looking for advanced ad blocking for complex ads or autoplay videos, then you might consider specialized extensions.
Does the strict blocking level affect the browsing experience?
Yes, it may disable some page elements like dynamic banners or dropdown menus on certain sites. So it is advisable to use it only when necessary.
How to restore default settings if you encounter issues?
Go to “Settings > Privacy and services > Tracking prevention” then select “Balanced” or turn off the feature and then turn it back on. This will restore the settings to their default state.
By following these steps and utilizing the built-in ad blocker settings in the Edge browser, you will achieve a faster and safer browsing experience, while maintaining privacy and reducing data drain.