
Contents
Some devices encounter the famous error message when trying to install Windows 11: This PC can’t run Windows 11 or This PC does not currently meet the minimum system requirements to run Windows 11. Sometimes you might see The processor is not currently supported.
This is often due to not meeting compatibility requirements, the most prominent of which is the support for the TPM 2.0 chip.
In this article, we will provide a comprehensive guide to solving the incompatibility issue with Windows 11, and how to bypass Windows 11 requirements, clarifying official compatibility checking methods, and the quickest alternative solutions to bypass the TPM 2.0 restriction, benefiting from experiences and resources such as Microsoft (Microsoft Documentation), and other reliable sources.
Common Causes of the Error Message
Before diving into solutions, it is worth noting that the message “This PC can’t run Windows 11” can appear for various reasons, including:
- First: The processor does not support new standards such as Secure Boot or TPM 2.0.
- Second: BIOS settings are disabled for the required security features.
- Third: Older versions of UEFI that are incompatible with the way Windows 11 loads.
Officially Checking Device Compatibility
To start, it is preferable to check the device status using the official “PC Health Check” tool from Microsoft. After installing and running it:
- The application checks for processor support.
- It checks for the presence of a TPM 2.0 chip and whether it is enabled in the BIOS/UEFI interface.
- It ensures that Secure Boot is enabled.
If the tool shows that the device is incompatible, you can proceed with one of two options: adjust BIOS to enable TPM 2.0 and Secure Boot or use software tricks to bypass this restriction.
Solving the Issue of the Device Not Supporting Windows 11 Update
There are three solutions for the problem of device incompatibility with the Windows 11 update. We will mention two of them here and list the third solution in a separate paragraph. Let’s start with the first two quick solutions:
1. Solution by Enabling TPM 2.0 and Secure Boot from BIOS
The device may not be supporting the Windows 11 update because it is equipped with a TPM chip but it is not activated, follow these steps:
Entering BIOS/UEFI Settings
During startup, press the appropriate key (Esc / F2 / F10 / Delete) according to the manufacturer’s recommendations. You will find an option for TPM or PTT (Intel Platform Trust Technology) in the “Security” tab. Enable it, then look for the Secure Boot option in the “Boot” tab and enable it.
Saving Settings and Restarting
After adjusting the previous options, save the changes (Save & Exit), and restart the device, then rely on the PC Health Check tool to ensure the problem is resolved before starting the installation process.
2. Solution by Bypassing TPM 2.0 Requirements via Registry Modification
For a quick software solution, you can modify the Windows registry as follows:
Disclaimer:
Please back up your files and current system first. These bypasses are experimental and unofficial solutions. Therefore, if any error or failure occurs during the installation, you are fully responsible, and Microsoft or the author of this article bears no legal or personal responsibility.
- Open the “Registry Editor” by searching for regedit in the Start menu.
- Navigate to the key:
HKEY_LOCAL_MACHINE\SYSTEM\Setup\MoSetup - If the MoSetup key does not exist, right-click on Setup and choose New > Key, then name it MoSetup.
- Inside MoSetup, create a new DWORD 32-bit value named AllowUpgradesWithUnsupportedTPMOrCPU.
- Double-click on the value and set the value data to 1.
In this way, the system ignores the requirement to support TPM 2.0 and unsupported processor during the upgrade to Windows 11 (source: TenForums).
There is an excellent third solution via the Rufus tool.
Bypassing Windows 11 Requirements Using Rufus Tool
There is another solution using the free Rufus tool that allows you to place a Windows 11 installation system on a USB flash drive with the option “Extended Windows 11 Installation (no TPM/no Secure Boot). This means automatically bypassing the restrictions of your old device.
All you need to do is follow the following steps in order:
First: Prepare Windows 11 on the Flash Drive
- Download the official Windows 11 copy in ISO format from Microsoft’s website from this link
Choose the third option ISO for x64 devices and then select Windows 11 (multi-edition .. from the list.
Then scroll down the page and select Confirm, then another confirmation message will appear to choose the language… Complete the options and download the ISO file.
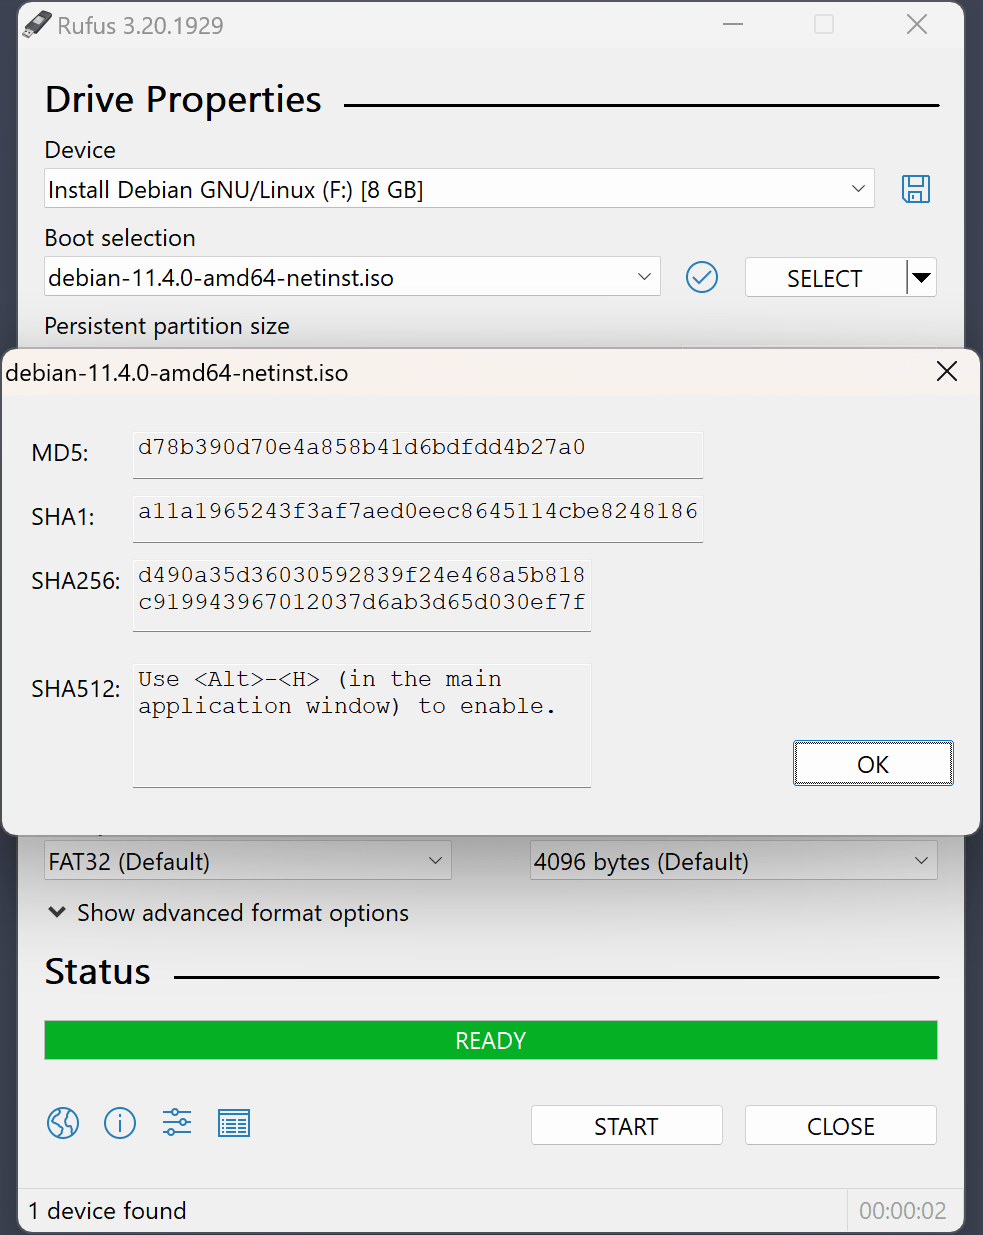
- Download the latest version of the Rufus program and open it, then connect a USB flash drive (with at least 8GB capacity).

- Inside the program, select the target flash drive, then click on SELECT and choose the ISO file you downloaded.
- The most important step: When you click on the START button, a pop-up window will present you with system customization options. Check the first option: Remove requirement for 4GB+ RAM, Secure Boot and TPM 2.0

- Agree to start and wait until the tool finishes completely. Now the flash drive is magical and ready to install Windows 11 on any device without objection.
Second: The Windows 11 Installation Stage
Restart your computer, then enter your device’s boot menu and select boot from the USB flash drive to open the Windows 11 installation interface.
Follow the usual steps (choose language and region) until you reach a screen asking you what type of installation you want. Here you have two paths to choose from:
The first path: Upgrade – Keep your files
- How is it done? Choose the first option “Upgrade: Install Windows and keep files”.
- What happens? The installation wizard will install Windows 11 over your current system, keeping all your files, programs, and previous settings without deleting anything.
The second path: Clean Install – Starting from scratch (recommended for better performance)
If you experience slow problems with your old system and prefer to wipe it completely to start fresh and achieve peak performance, follow these steps precisely:
Important Alert: This path will erase everything on drive :C (such as files on the desktop and documents), so ensure to transfer your important files to another drive or external USB before starting.
- On the installation type screen, select the second option “Custom: Install Windows only (advanced)”.
- A list of your current hard disk partitions will appear. Look for the partition of your old system (usually identified by the matching size of drive :C and labeled as Primary).
- Select this partition and click the Delete button; its space will turn into unallocated space (Unallocated Space).
- Select this new space and then click on New and then Apply; the Windows installer will automatically recreate and format the partition with the correct operating system compatible with the new structure.
- Click Next for Windows 11 to start the clean and stable installation benefiting from the bypass we prepared earlier via the Rufus tool.
Additional Tips
- Update BIOS/UEFI: Check your device manufacturer’s website for the latest BIOS/UEFI version, as this may automatically support TPM 2.0 and solve the processor-specific detail issue.
- Ensure Driver Compatibility: After upgrading, ensure to download the latest drivers from the manufacturer’s website or via Windows Update to avoid slow performance or some features stopping.
- Check Hard Drive Status (HDD/SSD): Before installation, check the storage status using S.M.A.R.T tools to avoid installation failure midway.
Frequently Asked Questions
Yes, by modifying the registry or using tools like Rufus to bypass the TPM 2.0 requirement, but it is preferable to maintain the security protocols associated with the chip.
It may indicate an old processor that does not support certain instructions (such as SSE4.1), or RAM of less than 4GB, or lack of Secure Boot support.
It is sufficient to support DirectX 12 with WDDM 2.0 to work Windows 11 smoothly, which supports most modern and mid-range cards.
You may lose certain security features such as TPM Vault and BitLocker relying on the TPM 2.0 chip, so be sure to use alternative encryption solutions when needed.
You can also rely on PowerShell commands (Get-TPM) or the built-in tpm.msc tool in Windows to check the chip status and version details.