Contents
Our article today is about The Best File Recovery Software for Accidentally Deleted Files on PC, why you need it, how to choose it, and how to use it step by step.
Loss of files is very important, and it can happen to anyone, whether due to accidental deletion, formatting, or even disk damage. But the good news is that there are a range of powerful tools to easily recover deleted files. In this article, we will review the best file recovery software for Windows, with a practical explanation of how to use them, and when to choose each tool.
In the end, we will teach you how to recover deleted files without downloading any software. This is the gift of today’s article.
You can check out the article How to Recover Deleted Files After Formatting. It contains important details as well.
Why Do You Need File Recovery Software?
When you delete a file on Windows, it is often not permanently erased from the disk: the operating system just marks that the space has become “empty” but the old data may remain until new files are written over it. By using the right program, these “raw” areas can be cleared and the files can be recovered.
Additionally, some tools support complex cases such as recovery after formatting, SSD drives or damaged or lost partitions.
Criteria for Choosing a Good Recovery Program
Before diving into the list of programs, it is important to know what to consider when choosing a recovery tool:
- Supported file types: Images, videos, documents, emails…
- Scan speed: Some tools scan quickly, while others are deeper but slower.
- Free vs paid version: Is the free recovery size limited?
- System requirements: Does it work on your system (Windows 10, 11, SSD, HDD).
- Tool security: Some tools are open source, while others are commercial.
The Best File Recovery Software for PC
Here is a selected list of programs that have proven effective for recovering deleted files on your PC:
1. EaseUS Data Recovery Wizard
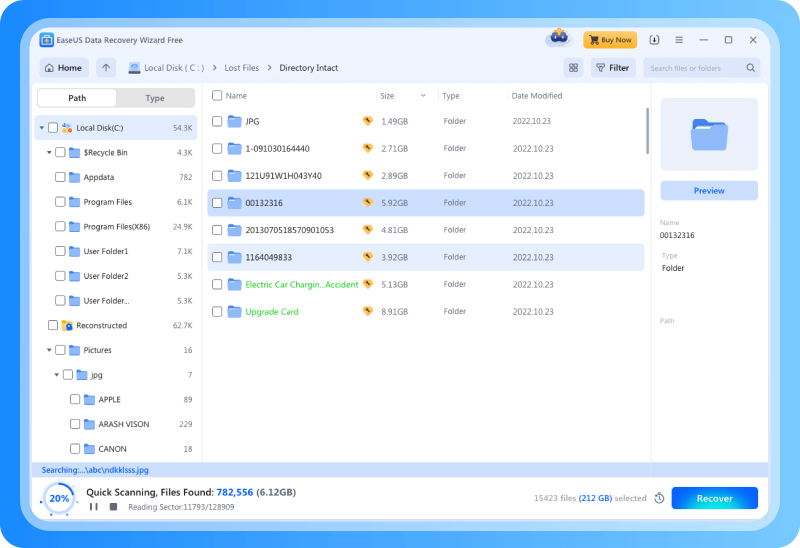
One of the most popular and widely used file recovery programs, especially for beginners and those interested in an easy-to-use interface. It offers a free version that allows recovery of up to about 2 GB for free depending on the company’s location, while the paid version is priced at $69.
The program supports Windows operating systems from 7 to 11 and has versions specifically for Mac.
- Tool website: You can download it from the official EaseUS website: https://www.easeus.com/datarecoverywizard/free-data-recovery-software.htm
- Usage:
- After installation, run the program.
- Select the partition or disk where you lost the files.
- Click on “Scan”. The tool supports “Quick Scan” and “Deep Scan”.
- After the scan is complete, review the available files and select what you want to recover.
- Save the files in a different location (preferably another disk) to avoid overwriting recoverable data.
2. Recuva
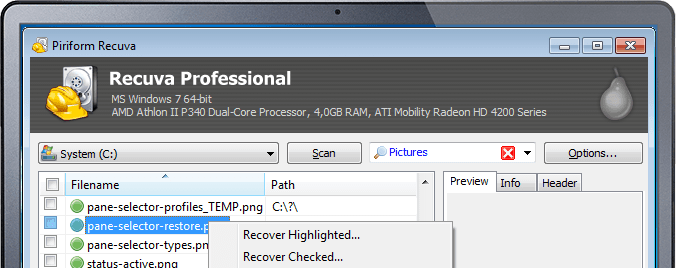
A very well-known free tool from Piriform, supports recovering files from hard disks, USB flash drives, camera memory, and more.
- Tool website: You can download Recuva from CCleaner/Piriform: https://www.ccleaner.com/recuva
- How to use:
- From the Recuva site, choose the appropriate version (you can download the portable version to avoid installation on the same disk from which you are recovering data).
- Run the program, and follow the recovery wizard: select the type of files (images, documents, video…) and then the location of deletion (like a folder or an entire disk).
- Click “Start” to run the scan.
- After the results appear, you can see the potentially recovered files, and then click on “Recover” to extract them to a safe location.
The advantage of Recuva is that it is lightweight and easy, but the effectiveness of recovery depends on whether the data has not been overwritten.
3. Disk Drill
A very powerful and comprehensive program, suitable for users looking to recover data from multiple media (hard disk, flash, SSD) and supports Windows and Mac systems. The program has a free version and paid versions. Here are the two main features in the free version:
- Allows you to recover images and files up to 100 MB.
- The data vault and protection from overwriting feature is available.
The Pro version costs $89 and the Enterprise version costs $499.
Download and try the Disk Drill file recovery tool:
- Download the program from the official site: https://www.cleverfiles.com/ar/data-recovery-software.html
- After downloading and installing, follow these steps:
- Open the program and select “Data Recovery”.
- Select the data source (the disk from which the deleted files are to be recovered).
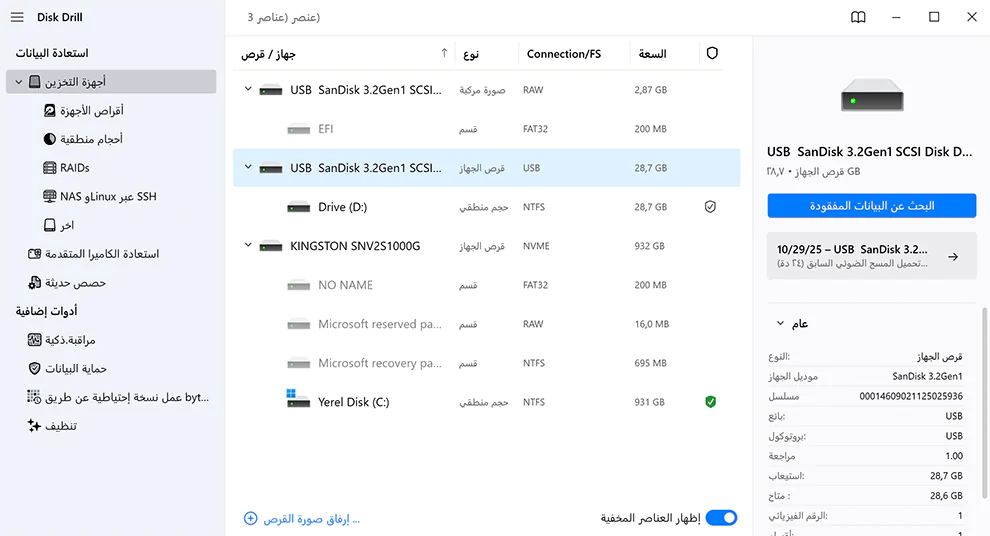
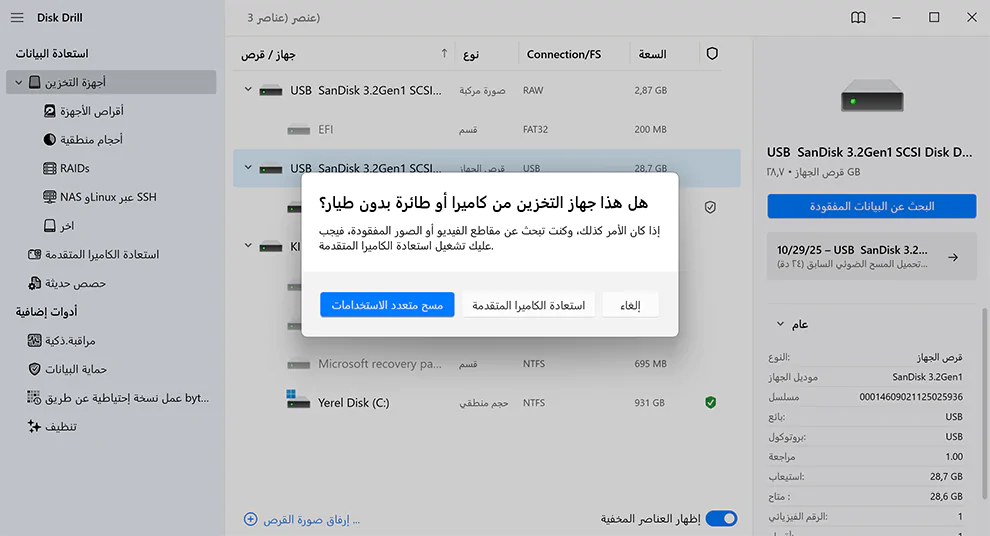
- Select Search for Lost Data. If the scanned disk is an external disk, a message will appear asking you to choose the nature of the scan. Comprehensive scan, which searches all types of files, and Advanced image recovery, designed to recover unmodified images from cameras and drones. If it’s a disk belonging to your computer, you’ll choose between surface scan and deep scan.
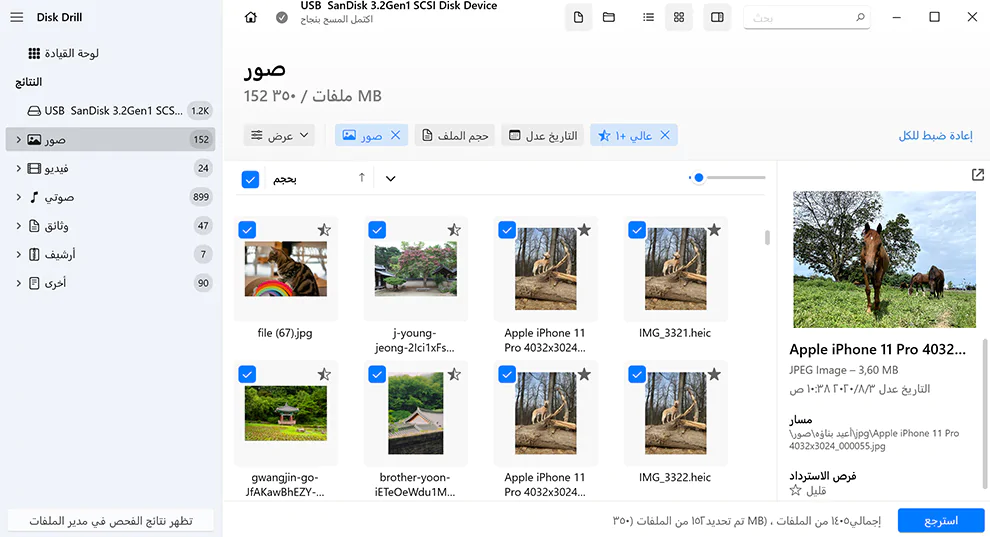
- Wait for the scan to complete, then browse the files that can be recovered.
- Select the files you want to recover and click Recover and save them to a different location.
The advantage of Disk Drill is that it supports the “Recovery Vault” feature that saves information about deleted files to prevent overwriting them if activated before deletion.
4. PhotoRec
An open-source program from the TestDisk project, designed to recover many types of files (images, documents, etc.) from various storage media.
- Tool website: The official website of the TestDisk / PhotoRec project: https://www.cgsecurity.org/wiki/PhotoRec
- How to use:
- Download the tool from the official site.
- Extract and run the command line interface (CLI).
- Select the disk or partition you want to scan (PhotoRec does not write to the source disk, reducing the risk of data corruption).
- Select the file formats you are looking for (some tools allow specifying the file type to speed up the scan).
- Select the location to save the recovered files (preferably an external disk or different partition).
PhotoRec is very powerful but may require some experience as it operates from the command line, but it is very useful in recovering complex files or large archives.
5. TestDisk
If the problem is not just deleting a file but deleting an entire partition, then TestDisk is the ideal tool. It is also open source.
- Download link: Same site as PhotoRec: https://www.cgsecurity.org/wiki/TestDisk
- Usage:
- Download TestDisk.
- Run it as an administrator.
- Select the disk that contains the lost partition.
- Use options like “Analyse” to analyze the old partition table, or “Deeper Search” if you do not see the required partition from the start.
- After finding the partition, you can restore it or copy files from it.
It is a very technical option but very effective in advanced loss situations, such as partition table corruption.
6. DMDE (DM Disk Editor and Data Recovery)
A very powerful program, supports disk editing and data extraction from complex drives, RAID systems, or damaged partition devices.
- Program site: https://dmde.com/
- Usage:
- Download the DMDE version (there is a free version for personal use).
- Run the program and choose “Open volume” or open a disk image if you have backed up the disk.
- Use the scan tool or “Recover files” to explore deleted files.
- Select the files to recover and choose a safe location to save them.
The advantage of DMDE is that it offers a great deal of control over scanning and data recovery, especially in complex cases like damaged partitions or RAID drives.
7. 4DDiG Data Recovery
One of the popular tools for recovering files after deletion or formatting, it features an easy interface and supports many file types. It is from the company https://www.tenorshare.net / we recommend checking the official company site for many distinctive tools like file repair, duplicate file deletion.
- Tool site: You can access it from the program site https://4ddig.net/ or from trusted sites.
- How to use:
- Download 4DDiG and install it.
- Run the tool and select the type of scan (such as quick scan or deep scan).
- Select the location (disk, partition, flash drive…) where you lost the files.
- Open scan results, with previews of deleted files.
- Select the files you want to recover and save them to a different location (preferably another disk).
8. Windows File Recovery (Microsoft’s Official Tool)
If you want to use an official tool from Microsoft, Windows File Recovery is a strong option, but it works through the command line (CLI).
- Source of the tool: You can install it from the Microsoft Store.
- Basic usage:
- Open PowerShell or Command Prompt or CMD as an administrator.
- Type the command
winfrwith the appropriate options:- Example:
winfr C: D: /n *.docx(to search for Word files with the docx extension on disk C and recover them to disk D)
- Example:
- Wait for the scan and process to complete.
- If the disk is NTFS, use the “Segment” or “Signature” mode for deeper scanning.
This tool is very useful for advanced users or technicians, especially since it doesn’t require installing a large program and can run quickly on specific files.
Important Tips for Successfully Recovering Files After Accidental Deletion
To make things clear, here is a method of working to recover a deleted file from a system disk (like C:) using one of these tools:
- Stop using the partition/disk from which the file was deleted
The more new data you write, the lower the chances of recovery. Why? Because there is always a potential for overwriting old files. - Choose the appropriate tool
- If you want an easy interface → use EaseUS or Recuva.
- If the situation is sensitive (lost partition or damaged drive) → use TestDisk or DMDE.
- If you want an official tool → use Windows File Recovery.
- Download the tool from the official site. Do not look for sites you do not know because you may face missing files problems and encounter ransomware issues and lose all your files!
- Install the tool if necessary, or use the portable version if available.
- Press Scan and choose the appropriate scan type (quick or deep).
- After the scan, look for the deleted files and select the ones you want.
- Recover the files to a different disk/folder to avoid overwriting lost data (always recovery should be to a disk different from the source disk).
- Check the recovered files to ensure their integrity. Open those files as they may seem operational but could be corrupt.
Tips to Avoid Overwriting Deleted Data
- After deleting an important file, do not download a very large program or copy many files to the same disk.
- Use a external disk or flash drive to save the recovered files.
- If the tool supports creating an image (disk image) before scanning, do that: some tools like DMDE allow scanning a copy of the disk instead of the original source.
Conclusion
When you accidentally delete a file, there is no need to panic: there are many best tools for recovering deleted files, whether free or paid, that can save your files. By using tools like EaseUS Data Recovery Wizard, Recuva, Disk Drill, or technical tools like PhotoRec, TestDisk, and DMDE, you can recover most lost files as long as they haven’t been overwritten with new data.
The most important thing is to use the right tool according to the type of problem and to work correctly (scan, review, recover to a different disk) to avoid recovery failure. By following the above steps, you can safely recover lost files with minimal risks.