

Contents
The Blue Screen of Death (BSOD) is one of the most annoying problems for users of the Windows 10 operating system, as it appears suddenly upon startup or during work, forcing the user to restart and lose unsaved data.
This article aims to provide a detailed and comprehensive explanation of how to diagnose the causes of the blue screen appearing at boot, along with practical steps to solve it and reduce its recurrence in the future.
Causes of the Blue Screen Appearing When Starting Windows 10
There are many reasons that lead to the appearance of BSOD on Windows 10, which can be summarized simply as follows with explanations of their mechanisms:
First, the problem may be caused by a conflict in device drivers, where an old or corrupt driver version leads to failure in communication between the operating system and hardware components like the graphics card or audio card.
Second, corruption of system files due to a sudden power outage or improper shutdown of the computer, which causes errors in the system’s core files.
Third, hardware malfunctions such as bad sectors on the hard disk or overheating of the processor, prompting Windows to shut down as a precaution to prevent damage.
Fourth, the presence of malicious software or harmful software that interferes in startup processes and causes system crashes.
Fifth, inappropriate BIOS or UEFI settings, especially when enabling advanced options like Overclocking can lead to instability.
Steps to Fix the Blue Screen Problem (BSOD)
To overcome the BSOD problem when starting Windows 10, we provide here a series of sequential professional steps that enable you to restore system stability without the need for a complete reinstall in most cases.
Step One: Enter Safe Mode
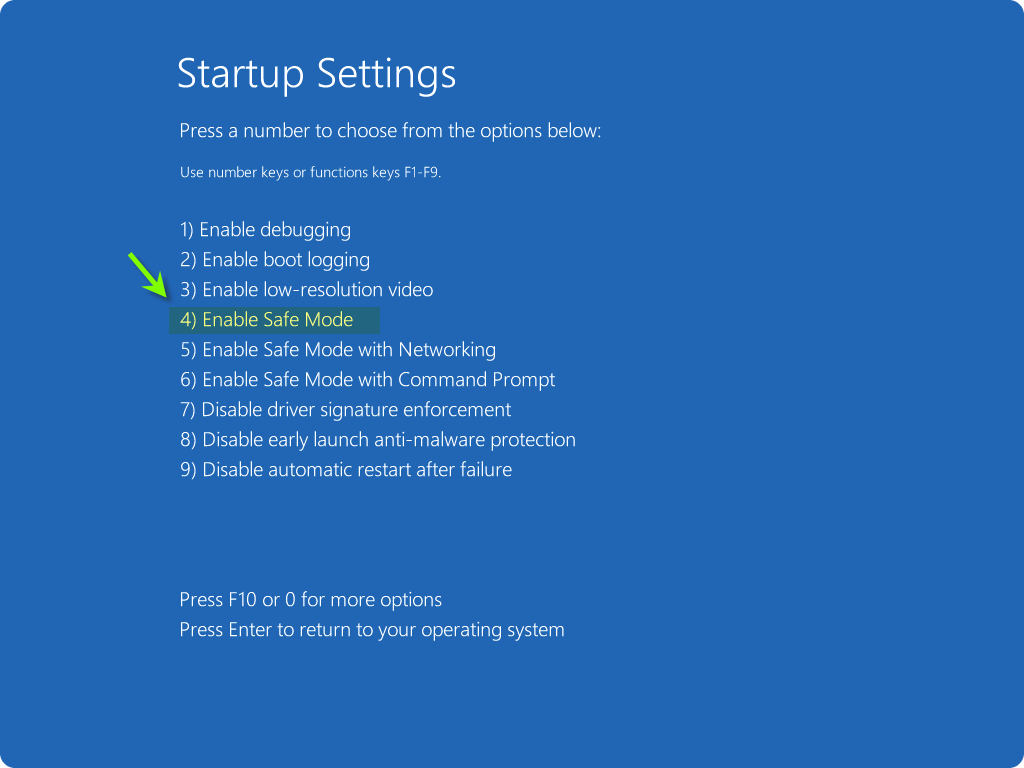
When facing a recurring blue screen, it is advisable to first boot the computer into Safe Mode. This can be done by pressing the F8 or Shift+F8 key during boot or via the Windows installation media. Safe Mode allows you to load a basic driver system, making it easier to diagnose whether the problem is caused by an external program or a malfunctioning driver.
Step Two: Update Device Drivers
After entering Safe Mode, go to “Device Manager” and check for any yellow exclamation marks indicating problematic drivers. Visit the manufacturer’s site for hardware components like NVIDIA, AMD, or Intel to download the latest version of the graphics, network, and audio drivers.
Ensure that the driver is compatible with the version of Windows 10 you are using, whether it is 32-bit or 64-bit.
Step Three: Check Disk
To rule out the existence of bad sectors on the hard disk, open the CMD prompt with administrator privileges as shown in the image:
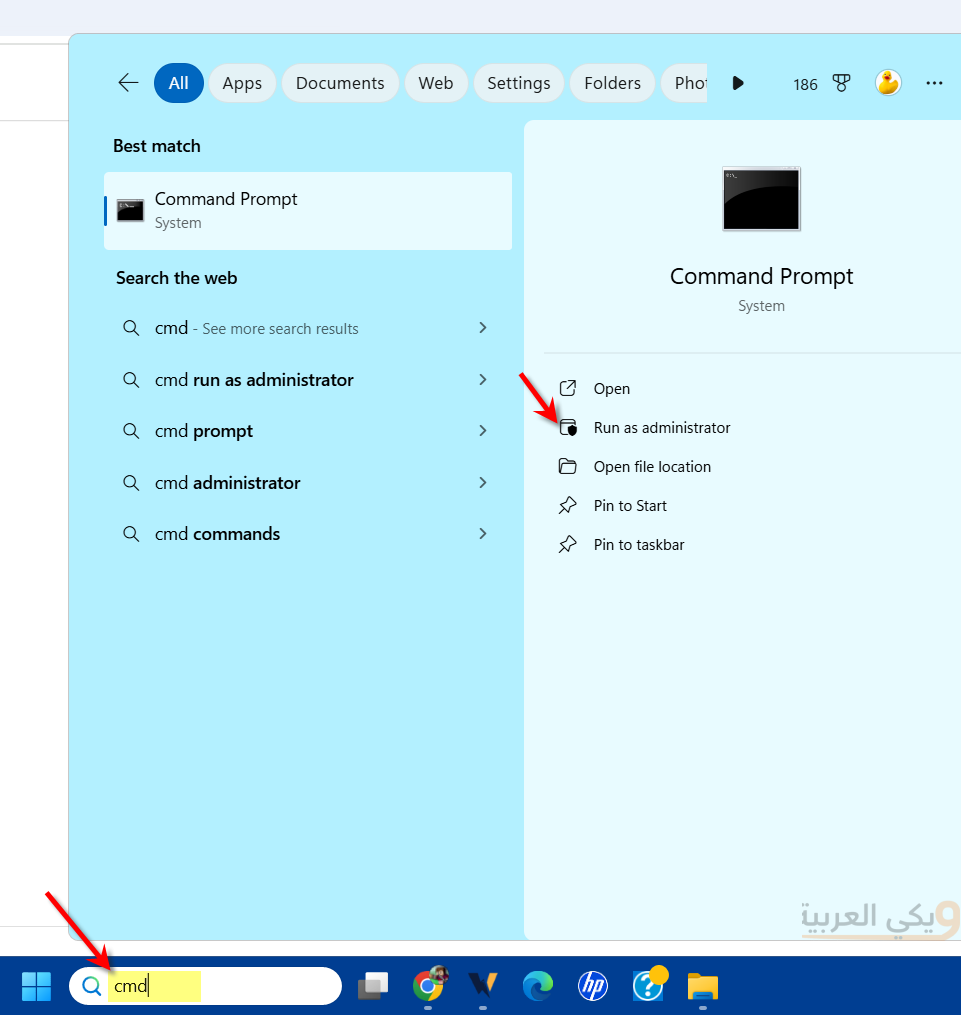
Then type the following command:
chkdsk C: /f /r
The system will check the C drive for fixable errors and discover bad sectors. The check may take some time depending on the size of the disk and the extent of damage.
Step Four: System File Check (SFC and DISM)
If there are missing or corrupt system files, you can use the built-in SFC and DISM tools. But this tool works through the CMD prompt. Once the black window is open, copy the following commands one at a time:
First: DISM tool (preferably start with it to repair the system store – to restore Windows image from the local store or Microsoft server):
- Type the following command
DISM /Online /Cleanup-Image /RestoreHealthand then press Enter. - Note: The download may pause at 20% or 40% for a while, this is perfectly normal. Wait until it completely finishes and shows a success message.
Second: SFC tool (to scan individual files – to check system files and replace corrupted ones with original copies):
- After the first command completes, type the following command
sfc /scannowand press Enter. - The system will perform a comprehensive scan, and in the end, it will inform you if it found corrupted files and repaired them.
These commands work to repair the system registry and restore affected drivers and files.
Quick Technical Tips:
- Internet connection: It is preferable to be connected to the internet when running the
DISMcommand to enable Windows to fetch original files from Microsoft servers if needed. - Do not close the window: The processes may take 5 to 20 minutes depending on your device speed and the volume of issues; do not close the window until a new line appears that allows you to type again.
Step Five: Use System Restore
If you have created a restore point before the issue occurred, System Restore to a previous point can help revert back to stable settings and programs. Type “System Restore” in the search box, then follow the System Restore wizard to choose a point before the blue screen appeared. Be sure to save any important data before this process, as some recently installed programs may be removed.
Step Six: Check for Malware
Sometimes viruses or ransomware can cause system files to fail at startup. Use reliable antivirus programs or the Windows Defender Offline tool to perform a full system scan before starting Windows.
Make sure to update the databases before the scan to ensure the detection of the latest types of malicious software.
Step Seven: Reinstall Windows 10 as a Last Resort
If all the above steps fail, the last option might be to reinstall the system. Use the Windows Media Creation Tool to create an installation medium on a flash drive, then choose “Custom install” while formatting the primary partition.
Be sure to back up your files before proceeding, as the process will delete all data on that partition.
Preventive Measures to Avoid Blue Screen Appearance
To maintain Windows 10 stability and avoid BSOD in the future, follow these important preventive tips:
- Always make sure to install the latest Windows updates released by Microsoft to fix security vulnerabilities and software errors, and update device drivers only from official sites.
- Monitor the temperature of the processor and graphics card using specialized tools, and ensure to clean fans and maintain heatsinks, monitoring fan speed when necessary.
- Avoid downloading and installing software from untrusted sources, and always use antivirus software with automatic updates for the databases.
- Also, create restore points periodically and keep a backup of important files on an external hard drive or a secure cloud.
How to Avoid the Blue Screen of Death
First, you can enable the “Fast Startup” feature in Windows 10 to speed up the boot process and partially load files from hibernation, but it may sometimes cause conflicts with some drivers, so try disabling it if the problem persists.
Another matter, if you are using SSD drives, make sure to enable the TRIM technology through the command “fsutil behavior query DisableDeleteNotify” in the command prompt.
Third, if you are making changes in BIOS like overclocking the processor or memory, temporarily revert the settings to default to check for system stability.
Finally, monitor the event log (Event Viewer) and look for Critical or Error events related to BSOD for further technical details.
Frequently Asked Questions About the Blue Screen
The error code usually appears in a string starting with 0x or an error name like “CRITICAL_PROCESS_DIED”. You can note this code and search for it online for tailored solutions.
Yes, in most cases, data can be recovered using file recovery programs such as Recuva or by connecting the hard drive to another device as an external drive.
Try completely removing the conflicting driver from “Device Manager”, then install an older or newer version from the official site. You can also use a tool like “Display Driver Uninstaller” to thoroughly clean the remnants of drivers before reinstalling.
Encryption programs like BitLocker do not cause a BSOD by themselves, but if the system file is damaged during encryption or decryption, a blue screen may appear. It is advisable to back up before encrypting drives.
Yes, there are free tools like “BlueScreenView” that display error details and the names of files causing the issue, as well as “WhoCrashed” that reads system logs and provides a technical explanation of the error.